Building a Custom N Scale Structure
- Nov 14, 2023
- 5 min read

Part of the fun, for me at least, of building a layout based on a real world prototype is trying to recreate a model as closely as possible to the prototype. I consider myself to be an impressionist artist so my inspiration comes directly from real world places and experiences.
Among several unique buildings in the area of Bush Terminal I'm modeling, is this gem on 1st Ave and 41st Street.

It's essentially your run of the mills roadside brick warehouse, but with the northwest corner of it cut off to allow the Bush Terminal tracks to snake their way from 1st Ave to 2nd Ave. A similarly unique building can be found on the 2nd Ave side where the tracks pass through the corner/underside of a warehouse there, though I'm not modeling that particular building -yet.
The building on the corner of 1st Ave is actually so close to the tracks that there's damage from freight cars passing too closely! I found a DVD of the NJCH and a segment shows off this building and it's proximity to the tracks and my-oh-my boxcars pass within inches of the structure.
On my layout in its current format, the track heading East off of 1st towards 2nd runs into the backdrop. But since this is a signature scene on the prototype I wanted to take the opportunity to model it myself.
Obviously there's no kit out there replicating this building so I knew I was going to need to scratch build or kitbash one myself. After studying a few images of the structure and the available space on my layout, I determined DPM modulars would be my best bet.
The next series of photos outlines the entire build process from mockup to completion.
I printed out a bunch of their free templates and crated a mockup to determine what parts I would need and if it would actually fit in the space I have available. I've never scratch built anything so my goal wasn't to replicate the structure 1:1, but simply to model it close enough. A similar shape and paint job should do the trick.


After building the mockup out of cardboard, I ordered the needed parts and began laying them out. Some wall sections were cut in half.
(if you ever plan to use DPM modulars, each kit piece contains 3 or more wall sections with pilasters, doors, windows, etc. I didn't know this an ended up ordering way too many)

I used Plastruct Plastic Weld to glue the pieces together. Where has this stuff been all my life?! I needed to file down some of the pilasters to get the angle needed. It probably could've been better but again, it's the best I was capable of with my current skillset.

Mockup and model next to each other. The mockup ended up being a little larger than the model but that's probably just due to the printer I used changing the scaling. It wasn't enough to cause any issues with the build. I also added the roof at this point and sealed up any gaps with Tamiya Putty.


I am of the opinion that all plastic kits should be entirely repainted from top to bottom if you don't want them looking like plastic kits. To my eyes, one of the biggest detractors from a models realism is that it's too bright in color and shiny. Painting the model gives you full control over all of that.
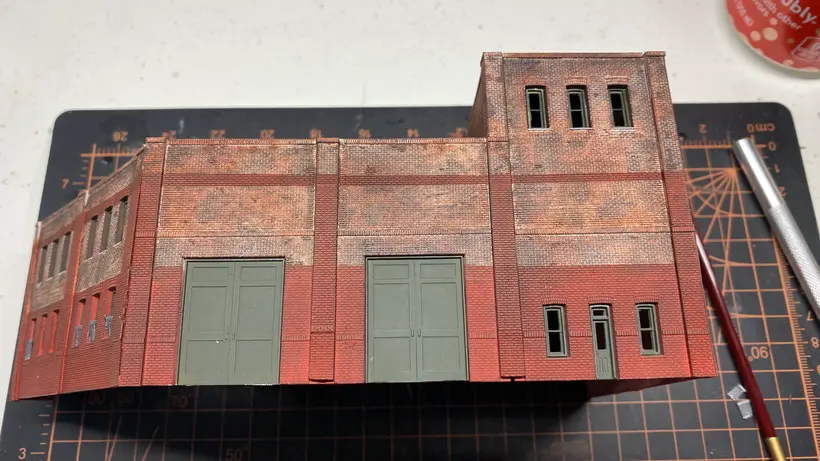
Here the model is primed with Tamiya white primer. You can also see some of the freight car damage to the corner of the building I replicated on the model.

I used Vallejo Air Hull Red and dry brushed it on for the initial brick color. I used the sides of a long soft brush to keep paint out of the mortar.

After the hull red, I used Mig Ammo rust paints for brick variation. Again I performed a very careful dry brush using the side of my brush. I went more heavy in some places and less in others. The objective here is to create variety in the tones of bricks used. I wasn't worried about getting paint inside the mortar but I did my best to keep it unpainted.

The prototype had some red striping on it which I replicated next with my airbrush. I mixed a few reds and grays to get the desired tone.


The prototype also had some striping in a different tone of red than what was used on the lower half of the building. I mixed up another batch of the same red and tried to lighten it up to a more orange tone with a few drops of yellow. The orange looked good on a test section of brick but didn't end up looking all that different than the rest of the red once I applied it. Not a big deal at the end of the day. It actually looks a little better in person than photographed but it's not a match at all.


And yes, the stripe does get slightly thinner to the right side of the picture but it's not terribly noticeable in person.
At this point the mortar was still looking way too bright to me. The brick tones were opaque enough, but I think just due to the proportion of mortar lines to brick in N Scale, the overall model looked too white. So at this point I got to weathering.
I used a cheap, large, soft makeup brush to apply some earth tone and black chalk to the model. I applied a layer of dull coat which made a lot of that chalk invisible, so I then did another weathering pass. The chalks helped tremendously to bring the different brick tones together while muting the overly bright mortar.
At this point I also added the doors and windows and a few other details which also helped bring the model together.

The last thing to tackle was the roof. I added just a few small details from what I could discern from Google Earth and decided to go for a tarpaper style roof. To achieve this look, I used a technique I learned almost 20 years ago. Cheap single ply toilet paper and different shades of gray paint. Essentially all you have to do is fold the TP in half and layer it where you want on the rooftop. Then wet the TP with water and slowly add color. As long as you're using water based paints, the paint will sap into the TP realistically and when it dries it'll hold it all in place. It actually photographed a lot brighter than it looks in person.
If you look up Boomer Diorama on Youtube, and check out Vlog #196, he has an excellent explanation on how he does something similar on his HO scale layout. Highly recommend.


I don't use window glazing unless I absolutely need to. In my opinion, N Scale windows just collect finger prints, dirt and dust and don't add much with regards to reflections.
And that's it! Onto the layout it goes!
It'll be a while before I get to scenic-ing the area around this structure but having it in place will now allow me to finalize the track arrangement here and begin paving the road.
I'm going to need to custom build several other buildings along 1st avenue on my layout so there will certainly be more of these types of posts. Hope you guys learned something and enjoyed the process as much as I did!


Comments